Back in the Windows 3.1 and earlier, install the new hardware is a nightmare. Each expansion slot must be setup manually, so you have to learn complex technical issues about how the PC actually works. If there is a problem, then the card might not work or, worse, a few other items of hardware stops working, and you must re-configure it as well.
Fortunately, Microsoft realizes it is a situation that is unacceptable, especially if they want to sell PCs to regular home users, and Windows 95 is the first appearance of their solution: Plug and Play. Now the new hardware is detected and configured by the BIOS and Windows itself, with minimal (if any) input from the user.
That was the beginning of the plan. The first version was not too reliable, and quickly gained a new nickname "Plug and Pray", but the situation resolved immediately. Now you can pick any of add-on, put them into any system, and it will work the way you expect. Of course that's only part of the Plug and Play.
How it Works Plug and Play in Windows XP
Plug and Play in Windows XP allows users simply connect the hardware and hand over the task of running the hardware configuration and the operating system. However, computer hardware, device drivers, and bios of all systems shall be designed so that in order to install the new device without user intervention. For example, although Windows XP provides Plug and Play function, otherwise there is no Plug and Play drivers are available for the device in question, then the operating system can not automatically configure and run the device.
At the time of installed hardware, such as when users install the camera into the USB port, Plug and Play Manager perform the following steps to install the device: after receiving the notification of the devices installed, the Plug and Play check what resources are needed by the device (eg interrupt, memory range, the range of I / O, and DMA channels) and to provide resources that the Plug and Play Manager checks the device identification number. He then checks the hard disk, floppy drive, CD-ROM drive, and Windows Update to obtain the appropriate driver with the device identification number. If there are multiple drivers, Plug and Play selecting the optimal driver by looking at the hardware ID, driver signature, and other features of the most suitable driver, then install drivers and run the device.
Device driver that is included with or installed on Windows XP must meet the standards of Windows Logo program. Device drivers that have passed compatibility testing Windows Hardware Quality Lab (WHQL) marked electronically and Windows XP detects the digital signal. For the sake of system stability, you should only use the device drivers that have been marked for Windows XP. A message will notify the user if drivers are not marked will be installed.

Expansion Plug and Play support depends on hardware and pe-set of drivers. For example, older devices that are not Plug and Play sound cards, such as Industry Standard Architecture (ISA) or a network card Extended Industry Standard Architecture (EISA) - can get the functionality of the Plug and Play drivers.
If the driver does not support Plug and Play, devices will behave as a non-Plug and Play. This can cause loss of some functions of the operating system. For example, power management features such as hibernation might not work. To monitor, Windows XP supports Plug and Play installation only if the monitor, graphics card and monitor drivers support Plug and Play, if not, the monitor detected as "Default Monitor". If you put the computer through a KVM switch, Plug and Play may not be running.
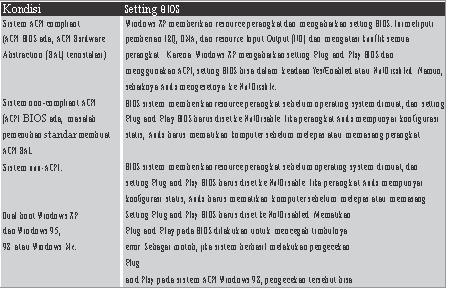
In Windows XP, Plug and Play support is optimized for computers that have Advanced Configuration and Power Interface (ACPI) BIOS. ACPI BIOS is responsible for detecting hardware that is not seen by the Plug and Play because the hardware is plugged into a bus that does not support Plug and Play. For example, the ACPI BIOS detects and helps configure system devices such as timers and programmable interrupt controller on the motherboard, that are not on a bus that supports Plug and Play.
In order for all Plug and Play feature to work, he must have the ACPI BIOS and devices and drivers that meet the Plug and Play. Advanced Power Management (APM) BIOS or a Plug and Play BIOS does not enable all the features Plug and Plau and not as good as ACPI. At the time of troubleshooting or changing the resource settings manually, see first whether the Plug and Play is provided by the operating system or BIOS. If the Plug and Play are handled by the BIOS and you manually change the resource allocated to the hardware (such as interrupt and memory range) then the change is permanent, and the operating system can not relocate these resources.
If hardware resources are permanent, Windows XP loses some ability to to resource allocation to all perangat optimally. If Windows can not allocate all resources in an optimal, most likely one or more devices not working properly because the resource allocation problem.
On x86 computers, the way the BIOS interacts with Plug and Play devices depends on who is to configure the hardware, BIOS, or operating system. If your computer has this option, setting the Enable Plug and Play operating system can affect these interactions. Some Plug and Play devices can be installed or removed at the time the system is running. For example, USB, IEEE
1394 and PC Card can be installed and removed from the system that lights up. At the time they are installed or removed hardware, operating system automatically detects the installation and removal device and manage the system and / or hardware configurations as needed.
If the device can not be removed at the time the system is running, you should notify the first operating system to avoid the problem. Safely Remove Hardware application tells the operating system that a device will be removed. In Tabek You can see different types of Plug and Play devices, and whether they can be released at the time the system is running.
Most people see the Plug and Play as a response to Windows when you install a new USB device for example, detect and ask you to install the driver. However, it was only a fraction of the labor Plug and Play. Plug and Play is actually used to detect all the hardware every time you turn on your PC and then provide the necessary system resources. IRQ (Interrupt Request Lines) is one example
Allocation process starts early, even before Windows starts loading, at the time the BIOS checks the installed hardware and determines which IRQ provided to the device. IRQ is not used is given to the PCI bus controller for re-allocation later. What do these BIOS helps if you have an old PC that is not fully able to handle Plug and Play unusual example, but almost totally useless for others. In fact, Windows XP to ignore any resource allocation made by the system BIOS, and enable the Plug and Play to handle everything from scratch. Ok, it might be a bit excessive.
Plug and Play is very smart, but he was not the only component of Windows: it also depends on your hardware, and drivers. The end result is much longer than you think. The condition of the system and BIOS settings can you see in the table.
Searching Tools
Search process Plug and Play hardware starting from the virtual driver named "Root", which represents your PC. He uses a system called HAL (Hardware Abstraction Layer) to retrieve the device and the controller on the motherboard and to know what type of bus. The driver then run the so-called routine enumeration to determine the device and another bus that has been linked and report results to the Plug and Play Manager. Each has found a new bus (eg USB controller) and then run their own enumeration routines, records all that connected to them. The process goes on until the Plug and Play knows all that is connected to your system.
Root of All
Is this beginning to sound like a tree, or folder structure? You are right. With Root at the top, and the folder with the PCI USB folder inside that instance holds all USB devices are connected. You can see the same thing in Device Manager. Click View, and then select Devices by Connection.
What we still do not see is how the Plug and Play know which driver is used for each device. That is not a problem for top-level system devices such as PCI bus, because they load Windows first. Which one? You can see everything in the Registry: run Regedit, go to HKEY_LOCAL_ MACHINE \ SYSTEM \ CurrentControlSet \ Services, and refer to existing devices. All that started Start 0 loaded in advance to make the system boot, so the Plug and Play no relationship with him.
However, the low-level devices such as sound cards and USB devices differently. Pa da time Windows find them, he should check to see if there is a suitable driver on your system. Any hardware that is found in the Plug and Play will provide some identification. First is the vendor code, and every person
which makes the add-on PC has rated each. For example, such as Iomega uses
13CA and no one else can use it. Both are the product codes used by manufacturers to identify the device.
Plug and Play and then use that code to create a special identifier for the device. If you have a Logitech USB Wheel Mouse for instance, he would seek "Vid_046d & Pid_c00e". "Vid 'show ID vendors, 046d is the code for Logitech," pid "is the product ID and 0411 is the code for Logitech Wheel Mouse.
Now Plug and Play needs to know if you've installed the drivers for the product and he was looking to see the Registry. Let Your Mouse Wheel is connected to a USB port it will be included in the HKEY_LOCAL_MACHINE \ SYSTEM \ CurrentControl Set \ Enum \ USB. Once found, use the Plug and Play Drivers to find its driver, and you are done.
However, if it is a new product there will be no entry that dima-sukkan into the Registry so that Plug and Play will run the New Device wizard. You then show a CD or folder containing the driver, or at least their INF files. Next, they installed and Plug and Play to continue with the boot. This is a complex process, but we do not have to worry anymore about the technical stuff, and it is the right path.

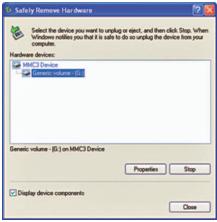
At the time of removing the device from the bus that supports hot plugging, if the Safely Remove Hardware icon appears in the notification area, use the Safely Remove Hardware to remove your device from the system safely. Applications Hardware Safely Re move tells Windows that the user wants to remove a device. This gives Windows a chance to prepare for the process by performing steps such as stopping the transfer of data to the device and remove device drivers.
The release of the hardware of the system running without using the Safely Remove Hardware application is often called the surprise removal because the operating system was not informed about such releases. Surprise removal can cause problems in the pe-run set of storage that the write caching, because at the time the device is suddenly released, can cause data loss or corruption. To reduce the data lost or corrupted when the device suddenly dilpes, Windows XP by default turn off write caching for the war-kat (like a camera that has the IEEE 1394 or USB storage, compact flash, etc.). While turned off the write caching can solve the problem, we recommend to use the Safely Remove Hardware application if it appears in the notification area. In addition, turned off the write caching can cause a decline in the performance of storage devices. In addition to the storage devices inside the computer that can not be removed suddenly, write caching by default run on high-performance storage devices such as IEEE 1394 and SCSI hard drives.
Write caching can be set on the Device Manager. In Device Manager, on the properties of storage, click the Policies tab to view the default settings write caching. If the Policies tab does not appear, it means that the write caching is not available for the device. If write caching is enabled, you can change it as needed.
Click Optimize for quick removal to turn off write caching on the storage and Windows. This allows you to disconnect the device without using Safely Remove Hardware application, but can affect device performance. Click Optimize for perfor-Mance to run the write caching on Windows, which can improve the performance of storage devices. However, you must use the Safely Remove Hardware application to remove the device from the computer.
If write caching is not turned on, the storage device can not be removed without turning off the computer. This option lets you lets you turn off write caching for the storage device, which can affect the performance of these devices. Users also must notify the operating system before removing the portable computer from the docking station.
Safely Remove Hardware
Before you remove the device from the bus that support, check whether there Safely Remove Hardware icon in the notification area. If there is, you should use Safely Remove Hardware application to notify the operating system that the device will be removed. To tell the operating system on the release of a Plug and Play devices, click the Safely Remove Hardware icon in the notification area. Icon displays a notification balloon that contains a list of devices installed on the system. Click the device you want to escape. The device is stopped and can be removed.


0 komentar:
Posting Komentar